HTML - attributes - s....

revision:


Content

"sandbox" attribute : enables restrictions for the content in iframe "scope" attribute : specifies what type of header a header cell is "selected" attribute : a boolean attribute specifying a pre-selected option "shape" attribute : specifies the shape of an area "size" attribute : defines the width and/or height of an element "span" attribute : defines the number of columns an element spans "spellcheck" attribute : specifies whether spelling and grammar are checked "src" attribute : specifies location of external source "srcdoc" attribute : specifies content to be shwon in iframe "srclang" attribute: specifies the language of the track text "srcset" attribute : specifies the URL of image used in different situations "start" attribute : specifies the first list item in ordered list "step" attribute : specifies number intervals for input element "style" attribute: specifies inline style for an element


"sandbox" attribute : enables restrictions for the content in iframe

top

The sandbox attribute enables an extra set of restrictions for the content in an iframe. The sandbox attribute can be used on the following element:<iframe>.

When the sandbox attribute is present, it will treat the content as being from a unique origin, block form submission, block script execution, disable APIs, prevent links from targeting other browsing contexts, prevent content from using plugins (through <embed>, <object>, <applet>, or other), prevent the content to navigate its top-level browsing context, block automatically triggered features (such as automatically playing a video or automatically focusing a form control).

The value of the sandbox attribute can either be just "sandbox" (then all restrictions are applied), or a "space-separated list" of pre-defined values that will REMOVE the particular restrictions.

syntax

<iframe sandbox></iframe >

<iframe sandbox="value"></iframe >

Attribute values:

(no value): applies all restrictions;
allow-forms: allows form submission;
allow-modals: allows to open modal windows;
allow-orientation-lock: allows to lock the screen orientation;
allow-pointer-lock: allows to use the Pointer Lock API;
allow-popups: allows popups;
allow-popups-to-escape-sandbox: allows popups to open new windows without inheriting the sandboxing;
allow-presentation: allows to start a presentation session;
allow-same-origin: allows the iframe content to be treated as being from the same origin;
allow-scripts: allows to run scripts;
allow-top-navigation: allows the iframe content to navigate its top-level browsing context;
allow-top-navigation-by-user-activation allows the iframe content to navigate its top-level browsing context, but only if initiated by user.

some examples

example

In thesource document, the video starts playback automatically. But in sandbox mode, the video does not autoplay.

codes:

                    <iframe style="margin-left:3vw;" width="500" height="300" src="../pics/Wuzhen-20-10_02.mp4" sandbox></iframe>
                    <p class="spec">In the <a href="../pics/Wuzhen-20-10_02.mp4">
                    source document</a>, the video starts playback 
                    automatically. But in sandbox mode, the video does not 
                    autoplay.</p>
                

example

codes:

                    <iframe style="margin-left:3vw;" width="500" height="300" src="../pics/Wuzhen-20-10_02.mp4" sandbox="allow-same-origin"></iframe>
                

"scope" attribute : specifies what type of header a header cell is

top

The scope attribute specifies whether a header cell is a header for a column, row, or group of columns or rows. The scope attribute has no visual effect in ordinary web browsers, but can be used by screen readers.

The scope attribute can be used on the following element: <th>

syntax

<th scope="value"></th >

Attribute values:

col specifies that the header cell is used for column;
row specifies that the header cell is used for row;
colgroup specifies that the header cell is used for group of column;
rowgroup specifies that the header cell is used for group of row.

some examples

example
Month Savings
1 January $100
2 February $80

codes:

                    <table style="margin-left:3vw;">
                        <tr>
                        <th></th>
                        <th scope="col">Month</th>
                        <th scope="col">Savings</th>
                        </tr>
                        <tr>
                        <td>1</td>
                        <td>January</td>
                        <td>$100</td>
                        </tr>
                        <tr>
                        <td>2</td>
                        <td>February</td>
                        <td>$80</td>
                        </tr>
                    </table>
                    <style>
                        table, th, td {border: 1px solid black;}
                    </style>  
                

example
NAME AGE BRANCH
Sophie 22 CSE
Marc 25 EC

codes:

                    <table style="margin-left:3vw;" border="1" width="500">
                        <tr>
                            <th scope="col">NAME</th>
                            <th scope="col">AGE</th>
                            <th scope="col">BRANCH</th>
                        </tr>
                
                        <tr>
                            <td>Sophie</td>
                            <td>22</td>
                            <td>CSE</td>
                        </tr>
                
                        <tr>
                            <td>Marc</td>
                            <td>25</td>
                            <td>EC</td>
                        </tr>
                    </table>
                

"selected" attribute : a boolean attribute specifying a pre-selected option

top

When present, it specifies that an option should be pre-selected when the page loads. The pre-selected option will be displayed first in the drop-down list. The selected attribute can also be set after the page loads, with a JavaScript.
With multiple options selected, only the last option with this attribute will be selected. However, a multi-select dropdown control, with the "multiple" attribute, can have multiple options selected.

syntax

<option selected></option>

This attribute has no values. Specifying the "selected" attribute with an arbitrary value has the same effect as specifying it with no value. For example, all of the following declarations have the same effect: selected, selected="true", selected="false", selected="on", selected="selected".

some examples

example

codes:

                    <label style="margin-left:5vw;" for="cars">Choose a car:</label>
                    <select id="cars">
                        <option value="volvo">Volvo</option>
                        <option value="saab">Saab</option>
                        <option value="vw">VW</option>
                        <option value="audi" selected>Audi</option>
                    </select>
                

example

codes:

                    <label style="margin-left:5vw;" for="pet-select">Choose a pet:</label>
                    <select name="pets" id="pet-select">
                        <option value="dog">Dog</option>
                        <option value="cat">Cat</option>
                        <option value="hamster">Hamster</option>
                        <option value="parrot">Parrot</option>
                        <option value="spider" selected>Spider</option>
                        <option value="goldfish">Goldfish</option>
                    </select>
                

"shape" attribute : specifies the shape of an area

top

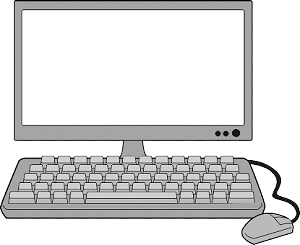
The shape attribute specifies the shape of an area and is used together with the "coords attribute" to specify the size, shape, and placement of an area.

The shape attribute can be used on the following element: <area>.

syntax

<area shape="value"></area >

Attribute values:

default is used to specify the entire region;
rect is used to specify the rectangular region;
circle is used to specify a circular region;
poly is used to specify the polygonal region.

some examples

example
Computer screen keyboard mouse

codes:

                    <img src="computer-map.png" alt="Computer" usemap="#computermap">                           
                    <map name="computermap">
                    <area shape="rect" coords="253,142,16,2" alt="screen" 
                            href="javascript:alert('screen was clicked');">
                    <area shape="rect" coords="262,218,0,156" alt="keyboard" 
                            href="javascript:alert('keyboard was clicked');">
                    <area shape="circle" coords="267,234,22" alt="mouse" 
                            href="javascript:alert('mouse was clicked');">
                    </map>
                

"size" attribute : defines the width and/or height of an element

top

The size attribute defines the width of the <input> and the height of the <select> element. It specifies the visible width, in characters, of an <input> element and works with the following input types: "text", "search", "tel", "url", "email", and "password".

To specify the maximum number of characters allowed in the <input> element, use the "maxlength" attribute.

syntax

<input size="number">

number: specifies the width of an <input> element, in characters. Default value is 20.

<select size="number"></select>

number: the number as value indicates the number of rows visible.

some examples

example


codes:

                    <form style="margin-left:3vw;" action="/action_page.php">
                        <label for="fname">First name:</label>
                        <input type="text" id="fname" name="fname" size="50"><br><br>
                        <label for="pin">PIN:</label>
                        <input type="text" id="pin" name="pin" maxlength="4" size="4"><br><br>                         
                        <input type="submit" value="Submit">
                    </form>
                

example

codes:

                    <form style="margin-left:3vw;" name="user_info" action="action_get.php" method="get"> 
                        <label>Select your favourite sports</label> 
                        <select size="3">
                            <option value="Soccer">Soccer</option>
                            <option value="Hockey">Hockey</option>
                            <option value="Tennis">Tennis</option>
                            <option value="Golf">Golf</option>
                            <option value="Badminton">Badminton</option>
                            <option value="Cycling">Cycling</option>
                        </select><br/>
                        <input type="submit" name="submit" value="Submit" />


"span" attribute : defines the number of columns an element spans

top

The span attribute defines the number of columns a <col> or <colgroup> element should span.

The span attribute can be used on the following elements: <col> and <colgroup>

syntax

<element span="number"></element>

number: an integer greater than zero indicating a number of columns of a table. Default value of HTML span attribute is 1.

some examples

example
ISBN Title Price
3476896 My first HTML $53
5869207 My first CSS $49

HTML codes:

                    <table style="margin-left:3vw;">
                        <colgroup>
                        <col span="2" style="background-color:red">
                        <col style="background-color:yellow">
                        </colgroup>
                        <tr>
                        <th>ISBN</th>
                        <th>Title</th>
                        <th>Price</th>
                        </tr>
                        <tr>
                        <td>3476896</td>
                        <td>My first HTML</td>
                        <td>$53</td>
                        </tr>
                        <tr>
                        <td>5869207</td>
                        <td>My first CSS</td>
                        <td>$49</td>
                        </tr>
                    </table>
                    <style>
                        table, th, td {border: 1px solid black;}
                    </style>
                

example
ISBN Title Price
3476896 My first HTML $53
5869207 My first CSS $49

HTML codes:

                    <table style="margin-left:3vw;">
                        <colgroup span="2" style="background:red"></colgroup>
                        <tr>
                        <th>ISBN</th>
                        <th>Title</th>
                        <th>Price</th>
                        </tr>
                        <tr>
                        <td>3476896</td>
                        <td>My first HTML</td>
                        <td>$53</td>
                        </tr>
                        <tr>
                        <td>5869207</td>
                        <td>My first CSS</td>
                        <td>$49</td>
                        </tr>
                    </table>
                    <style>
                        table, th, td {border: 1px solid black;}
                    </style>
                

"spellcheck" attribute : specifies whether spelling and grammar are checked

top

The spellcheck attribute specifies whether the element is to have its spelling and grammar checked or not.
The following can be spellchecked: text values in input elements (not password), text in <textarea> elements, text in editable elements

The spellcheck attribute is part of the global attributes and can be used on any HTML element.

syntax

<element spellcheck="true | false"></element>

true: the element is to have its spelling and grammar checked;
false: the element is not to be checked.

some examples

example

This is a praggagraph. It is editable. Try to change the text.

First name:

codes:

                    <p class="spec" contenteditable="true" spellcheck="true"> This is a praggagraph. It is editable. Try to change the text.</p>
                    <p class="spec">First name: <input type="text" name="fname" spellcheck="true"></p>
                

example

Did you knoww you can click me to edit my contentz?

Did you knoww you can click me to edit my contentz

codes:

                    <p class="spec" contenteditable="true" spellcheck="true">Did you knoww you can click me to edit my contentz?</p>                             
                    <p class="spec" contenteditable="true" spellcheck="false">Did you knoww you can click me to edit my contentz</p>                                                    
                

example

type something here

codes:

                    <div>
                        <input type="text" spellcheck="true" placeholder="type something here">
                        <p contenteditable="true" spellcheck="true">type something here</p>
                    </div>                                                
                

"src" attribute : specifies location of external source

top

The src attribute specifies the location (URL) of the external resource.

The src attribute can be used on the following elements: <audio>, <embed>, <iframe>, <img>, <input>, <script>, <source>, <track>, <video>

syntax

<element src="url"></element>

url indicating a file or resource. There are two types of URL links: absolute URL points to another webpage and relative URL points to other files of the same web page.

some examples

example

Click on the play button to play a sound:

codes:

                    <p class="spec">Click on the play button to play a sound:</p>                                                     
                    <audio style="margin-left:3vw;" src="../pics/horse.wav" controls>
                        Your browser does not support the audio element.
                    </audio>
                

example

Click on the image, and the input will be sent to a page on the server called "/action_page.php".


codes:

                    <p class="spec">Click on the image, and the input will be sent to a page
                    on the server called "/action_page.php".</p>
                    <form style="margin-left:3vw;" action="/action_page.php">
                    <label for="fname">First name:</label>
                    <input type="text" id="fname" name="fname"><br><br>
                    <input type="image" src="../pics/submit.gif" alt="Submit" width="24" height="24">
                    </form>
                

"srcdoc" attribute : specifies content to be shwon in iframe

top

The srcdoc attribute specifies the HTML content of the page to show in the inline frame. This attribute is expected to be used together with the "sandbox" and "seamless" attributes.
If a browser supports the "srcdoc" attribute, it will override the content specified in the src attribute (if present). If a browser does NOT support the "srcdoc" attribute, it will show the file specified in the src attribute instead (if present).

The srcdoc attribute can be used on the following element: <iframe>.

syntax

<iframe srcdoc="HTML_code"></iframe>

HTML_code: the HTML content to show in the iframe. Must be valid HTML syntax.

some examples

example

Your browser does not support iframes.

codes:

                    <iframe style="margin-left:3vw;" srcdoc="Hello from srcdoc!" src="https://www.lwitters.com/">
                    </iframe>
                    <p class="spec">Your browser does not support iframes.</p>
                

example

codes:

                    <iframe style="margin-left:3vw;" srcdoc = "<h3>Learning web development</h3>" src = 
                    "lwitters.com/coding.php">
                        <p class=spec">Browser does not support iframes.</p>
                    </iframe>
                

"srclang" attribute: specifies the language of the track text

top

The srclang attribute is used to specify the language of the track text. The srclang attribute can be applied on the <track>element

Note: srclang attribute is required with kind = “subtitles”.

syntax

<track src="subtitles_en.vtt" kind="subtitles" srclang="en">></track>

language_code specifies a two-letter language code that specifies the language of the track text data

some examples

example

codes:

                    <video style=margin-left:3vw;" width="340" height="220" controls>
                        <source src="../pics/Wuzhen-20-10_02.mp4" type="video/mp4">
                        <track src="some_video_subtitles.srt" kind="subtitles" srclang="en" label="English_subs">
                    </video>
                

example

codes:

                    <audio style="margin-left:3vw;" controls>
                        <source src = "../pics/horse.wav">
                        <track src = "subtitles.vtt" kind = "subtitles" srclang = "en" label =" English">                           
                        <p class="spec">:The browser doesnot support the file</p>
                    </audio>
                

"srcset" attribute : specifies the URL of image used in different situations

top

The srcset attribute specifies the URL of the image to use in different situations. This attribute is required when <source> is used in <picture>.

syntax

<source srcset="URL">

URL specifies the URL of the image. Possible values: an absolute URL - points to another web site; a relative URL - points to a file within a web site

Each src in srcset has the following format: URL width.

URL = Url or path to the image file;
width = atual image width in units of w (e.g. 450w).

Multiple src items are comma-separated.

some examples

example

Resize the browser window to load different images.

Flowers

codes:

                    <p class="spec">Resize the browser window to load different images.</p>
                    <picture>
                        <source media="(min-width:950px)" srcset="../pics/img_pink_flowers.jpg">
                        <source media="(min-width:665px)" srcset="../pics/img_white_flower.jpg">
                        <img src="../pics/img_orange_flowers.jpg" alt="Flowers" style="width:auto;">
                    </picture>
                

example

codes:

                    <picture>
                        <img srcset="../pics/vangogh-sm.jpg 120w, ../pics/vangogh.jpg 193w, ../pics/vangogh-lg.jpg 278w" 
                        sizes="(max-width: 710px) 120px, (max-width: 991px) 193px, 278px">
                    </picture>
                

"start" attribute : specifies the first list item in ordered list

top

The start attribute specifies the start value of the first list item in an ordered list. The start attribute can be used on the following element: <ol>.

syntax

<ol start="value"></ol>

Attribute values: it contains a numeric value which defines the start value of the first list item in an ordered list.

some examples

example
  1. Coffee
  2. Tea
  3. Milk
  1. Coffee
  2. Tea
  3. Milk

codes:

                    <ol start="50">
                        <li>Coffee</li>
                        <li>Tea</li>
                        <li>Milk</li>
                    </ol>
                    
                    <ol type="I" start="50">
                        <li>Coffee</li>
                        <li>Tea</li>
                        <li>Milk</li>
                    </ol>
                

example

Sorting algorithms

  1. Bubble sort
  2. Merge sort
  3. Quick sort

codes:

                    <p class="spec">Sorting algorithms</p>
            
                    <ol start="7">
                        <li>Bubble sort</li>
                        <li>Merge sort</li>
                        <li>Quick sort</li>
                    </ol>
                

"step" attribute : specifies number intervals for input element

top

The step attribute specifies the legal number intervals for an <input> element.The step attribute can be used on the <input> element.

Example: if step="3", legal numbers could be -3, 0, 3, 6, etc.

The step attribute can be used together with the "max" and "min" attributes to create a range of legal values.

The step attribute works with the following <input> types: "number", "range", "date", "datetime", "datetime-local", "month", "time" and "week".

syntax

<input type=" " step="number">

input type:date; value=1 (day); example: <input type="date" min="2019-12-25" step="1">

input type:month; value=1 (month); example:<input type="month" min="2019-12" step="12">

input type:week; value=1 (week); example:<input type="week" min="2019-W23" step="2"

input type:time; value=60 (seconds); example:<input type="time" min="09:00" step="900">

input type:datetime-local; value=1 (day); example:<input type="datetime-local" min="019-12-25T19:30" step="7">

input type:number; value=1; example:<input type="number" min="0" step="0.1" max="10">

input type:range; value=1; example:<input type="range" min="0" step="2" max="10">

some examples

example

codes:

                    <form style="margin-left:3vw;" action="/action_page.php">                                                               
                        <label for="points">Points:</label>
                        <input type="number" id="points" name="points" step="3">
                        <input type="submit">
                    </form>


example


codes:

                    <input style="margin-left:3vw;" type="date" min="2019-12-25" step="1"><br><br>
                    <input style="margin-left:3vw;" type="month" min="2019-12" step="12"><br><br>
                    <input style="margin-left:3vw;" type="week" min="2019-W23" step="2"><br><br>
                    <input style="margin-left:3vw;" type="time" min="09:00" step="900"><br><br>
                    <input style="margin-left:3vw;" type="datetime-local" min="019-12-25T19:30" step="7"><br><br>
                    <input style="margin-left:3vw;" type="number" min="0" step="0.1" max="10"><br><br>
                    <input style="margin-left:3vw;" type="range" min="0" step="2" max="10">
                

"style" attribute: specifies inline style for an element

top

The style attribute specifies an inline style for an element. The "style" attribute will override any style set globally, e.g. styles specified in the <style> tag or in an external style sheet.

The style attribute is part of the global attributes, and can be used on any HTML element.

syntax

<element style="property:value "></element>

The property is a CSS property. The value is a CSS value.

In "inline styling", the CSS rules are directly written inside the starting tag using the style attribute. The style attribute includes a series of CSS property and value pairs. Each "property : value" pair is separated by a semicolon ( ; )

some examples

example

This is a header

This is a paragraph.

codes:

                    <h3 style="color:darkgreen;text-align:center;">This is a header</h3>
                    <p class="spec" style="margin-left:3vw; color:crimson;">This is a paragraph.</p>
                

example

Example of Inline Style

First paragraph

Second paragraph

HTML codes:

                    <h3 style="margin-left:3vw;color:Blue;font-size:25px;">Example of Inline Style  </h3>
                    <p class="spec" style="margin-left:3vw;color:red;">First paragraph</p>
                    <p class="spec" style="margin-left:5vw;color:green;font-size:40px;">Second paragraph</p>